The Songs
O.V.E.R
For this song I wanted it to be quite guitar driven so I put them straight to the front, using a high end equalizer on the amplifier the guitar cuts through the other instruments in the song. As this was quite harsh in the beginning I added a bit of reverb and also a delay to carry on the sound each time the strumming finishes. Following the pattern of the high-end guitars I also wanted the high hats and the snare to cut through - kind of like a punk song, the sex pistols collection cd's gave me this influence. So everything so far is in the top end of the audio spectrum, which didn’t leave too much space for the vocals. Luckily the vocalist had quite a deep voice so I could play about in the middle of the EQ range (around 2k) and then for that little bit of emphasis I gave a little high end around 16k for that definition I wanted.
For the low ends of the songs are as normal, the bass guitar and the kick drum. As the guitars are all mainly in the top end of the spectrum I decided to put a little room reverb at around 25% to swamp the sound to say. The kick drum took the 40-110 and a little bit on the 3k range on the EQ at +6 to give it that driving sound that I want - but not too much as the bass guitar will get crowded out.
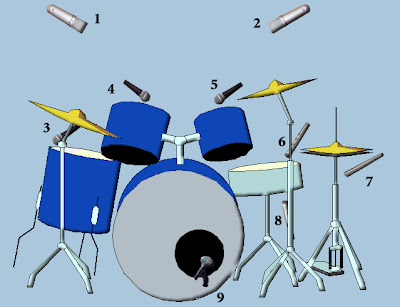
Along side with the guitars, the snare is a driving part to this song. With it being miked from below and from the top gave me easy access to a tinny sound (increasing the top snare output) or a deeper thuddier sound (increasing the bottom snare output). Firstly I gated off the low-end frequencies such as the bass or tom drums that leaked in the recording process. The high hats were still visible but didn’t worry me too greatly. Once the gating was complete I compressed the snare, which then allowed me the comfort of increasing the volume without any clipping.
Let Me Hear You Say
This track slightly follows the way that the previous track O.V.E.R. does as they are quite similar in style. So remembering what I did in that session I used in this one thereabouts. RTAS plug-ins such as compression for the vocals & high hats to lift them up in volume and punch through the mix, light reverb for vocals and anything else that needed toning down that little bit as they were too bright for my liking.
In the recording stage (in the studio and at home) DI boxes were used alongside the microphones to pick up the guitar and bass twice. The DI was tapped off before the signal reaches the amp so that only the natural strumming can be heard (e.g. no gain or tone controls from the amp are in this individual audio track). With this track I used an RTAS plug-in called amplitube. Amplitube has varied amount of guitar sounds such as wah-wah and distortion with various amp models and cabinets. I chose a sound that was quite grungy but still tolerable with the actual guitar sound from the recorded amplifier in the live room. The band The Vines were an influence for me at the stage of mixing the song.
Take Your Time
This track is my experimental one for various amounts of reasons. When I was taught about Foley where everyday sounds can be recorded and placed with video I decided to record a few of my own sounds and place them within the track near the beginning. I recorded a jet engine and then edited it within Cool Edit Pro using effects such as phase sweeping and a hint of delay to create a completely different sound. I cheated by using a midi keyboard to create a Morse code sound, all of this was to see if I could try and entwine them into the song. Another experiment was grouping and bussing various instruments so that I can have more layers and also making volume adjusting a bit faster. My favorite experiment was the over compressed drums during the second half of the verses and the interlude of the song mid way, the drums were so far compressed that the hits of the kit started to slightly phase out, not only this but the attack and release times were groggy. I compensated for this with bussing of the overheads, high hats and snare drum. Overall I love the drum sound when all the instruments have kicked in and the song is in full flow. The final part of the song has reversed lead guitar that was processed with Adobe Audition.
Glad You Could Make It
I used a midi keyboard in this track alongside with Sample Tank. Using pop violins they were equalized to mainly the mids and highs, thus bringing them out that little bit more. The guitar then used the space on the audio spectrum where the violins were not so they wouldn’t get muddled together, placing +12 dB at 20k, a low lying mid range and then a slight boost in the bass at around 40-80. The bass then sits on top of the guitars low end and carries through into the mid range allowing the freedom of carrying the song through as the violins take control in the choruses. The drum kit for this track is pretty much none existent as it is quite a slow song (oasis-ish) the bass drum was dynamically compressed using the bass guitar default in pro tools and then I used a plate reverb at 15 percent to make the kick echo slightly. For the previous tracks I setup the snare to have a quick attack time and really punch through in the mix. However, in this track I wet the sound with 1/3 of hall reverb and also gave a 300ms pre-delay and a 4.5 second decay to smooth out the hits and also give the snare the feel of being in the background.
The vocals sound was quite good for the initial recording so not much had to be done, slight compression with a soft knee, a little bit of reverb( but not too much) and finally bringing out the high end and dropping the low end all together whilst equalizing. As the singer had quite a deep voice.
There was some automation in the other songs e.g. fade out of jet sound at the start of Take Your Time. In Glad You Could Make It I automated the violins to be more prominent in the choruses and the outro and then be quieter in the verses. Also automating the guitars on all of the tracks (mainly the choruses) and allowing them to roam free in the breaks as any other instrument is turned down slightly to make way.


