The last year has nearly finished, where has the time gone!! So I’d thought I’d make one final category for my final year exhibition to show my progress, what I’m thinking of doing and finally how it looks. So here goes....
I am thinking of presenting my work on a website – kind of blog based but a bit more advanced, showcasing it this way will allow a user to browse through at their own speed and look at my work i have created over the last few years.
My first post will show a various fonts I have looked through on Photoshop and also a button template that i have created.
This is a button i created in Photoshop, it's a GIF image thats animated on a mouse rollover, and mouse down. Just because i can!
Labels
- All things bright and Multimedia (6)
- Artefacts - Rendering The Real World (20)
- Client Project One (1)
- Client Project Two (21)
- Final year portfolio Stuff and Co... (1)
- Games Design - 3D Model (4)
- Games Design - Card Game (8)
- Games Design - Level Making (4)
- Image Processing and VR (1)
- Image Processing and VR - Image Portfolio (3)
- Image Processing and VR - Virtual World (12)
- Metal Frog (1)
- Nottingham Forest Football Stadium (1)
- Photoshop Turorials (6)
- Sound (2)
- Sound - Recording and mixing a band (6)
- SPP 2 (3)
- The Verve At Nottingham Arena 11-12-07 (1)
Thursday, April 24, 2008
Artist portfolio - Krishnamurti M. Costa
The second artist I have looked at this week is a chap called Krishnamurti M. Costa. He does character animation, organic modelling and texturing in Maya and Zbrush. I think his work is fantastic especially his organic form modelling. Although i do not use Z brush myself i can see that it can create excellent realistic characters. He works for a company called CafeFX and has done work on movies such as Evan Almighty, Pans Labyrinth and Fantastic Four.
As I am not a character model myself I can just admire and appreciate the work that he creates. *Thumbs up*
http://www.antropus.com/resume.htm
Artefact Six - Realistic Lighting in Shade(Part 2)
A quality that Shade possesses post rendering is its ability to merge a background into the scene much like how post composition worked using Photoshop in the previous artefacts. The benefit of this is that it cuts out the post production stage when amending the rendered image. However after the conclusions in previous it is always worth having the post production stage. The final image can be seen in Figure 6.
Figure 6
The model was tested with 3D Studio Max lighting. From previous artefact conclusion the best rendering solution should be Mental Ray with it’s in built capacity to access indirect illumination – like Shade does and therefore giving a result that would be similar to the render from Shade. After countless tweaking of specifications the render below in Figure 7 is the best production of lighting for the model. Notice the shadows are sharper and also are not as soft and present at the back of the model. As discussed above how Shade lighting works is by creating an imaginary sphere around the object allowing light to hit and reflect back allocating softer more realistic shadows.
Figure 7. Rendering time 4 seconds.
When asking peers which they thought had the most realistic looking shadows all answers were positive for the Shade render. Away that 3D Studio max can create this sort of imagery is by using an advanced plug-in called VRay. It works in a similar way to how lighting in Shade works by calculating algorithms such as ‘path tracing’. This is advancement from raytracing where it calculates extended rays from around the scene instead of specific object thus lighting from a larger area, such as the “sphere” surrounding the object in Shade. An example of Vray can be seen in Figure 8 Titled Stitch Guy. The results are positive as the lighting system can make a model have a positive realistic result.
Figure 8. ‘Stitch Guy’ by Andrei Cirdu
Evaluation
Lighting in 3D Studio Max has its limits until a user does pay for advanced plug-ins such as V ray. Shade however creates renders using lighting systems similar to how V ray works, using algorithms and calculating paths of light that not only hit a specific object but manage other objects in a scene to create realistic softer shadows. Thus enrolling certain realism to an object. As the Shade application creates an imaginary sphere around a model for lighting, a user can set up a scene ready for rendering quickly and easily. However using such an application to create realistic renders is time costly as well. Image based lighting in shade can also be beneficial to produce a mood to a scene and also project unusual coloured lighting with dramatic effects that may have not been thought of before he lighting process.
Conclusion
The rendered output created from the Shade application does give very good results in terms of realistic lighting and shading. It would however be partially unpractical to use when a lot of frames are needed to be rendered such as an animation unless a rendering farm were available. Due to the length of each render the quality does stand out from the mental ray renderer in 3D Studio Max and this advanced realistic approach would be beneficial. A user must then approach a project in a manner that will decide what format, how a scene will be viewed, what speed a scene may be walked through and also think about the time costs before choosing which method would be best to create output. As realism can be more beneficial and a viewer can perceive this in a positive way, photorealism however is not always needed.
References
Figure 8 - ‘Stitch Guy’ – Andrei Cirdu - http://www.conceptart.org/forums/showthread.php?t=114720 Accessed 24/4/08
Artefact Six - Realistic Lighting in Shade(Part 1)
The final artefact will be looking at a 3D Package called Shade 7 and also looking in depth at its Image based lighting procedures that allow for realistic rendering with little effort. The experiments will involve the same model(s) for the consistency element and then also look at how lights are created, and how they react with images to create imagery that is realistic. That is to say the highlights and shaded areas on a model look consistent enough to follow real world patterns.
For this experiment a model of a woman posing shall be use, the complex geometry will then allow a user to easily define where the shaded area can be seen on the rendered images. The model is one of many from the ‘Poser’ collection that can be purchased through the internet. Figure 1 below shows the initial render with the default shade lighting.
Figure 1. Rendering time 160 seconds.
After creating a point light in the scene the areas on the model that blocks the light have instantaneous shadows placed on the geometry. The point light in Shade works the same way as an omni light in 3D Studio Max, which is the light source is emitted from a certain area and is then spread equally in all directions. Attenuation is easier to control in shade as the light works on a cross hair and the range of lit area is equal to the end of the cross hair. Figure 1 below demonstrates the outcome of the light source on the model.
Figure 2. Rendering time 240 seconds.
The lighting system in Shade allows a user to adapt the light source in a manner that creates both varying and unusual coloured renders quickly and easily. The light colour can be affected by placing a map on top, much like how theatre performances use different lighting colours to suggest different moods and times of day. An addition to this is how a light can be set up to illuminate an object from different angles, fine tuning a light can allow a user to produce an effect where an image can be projected onto an imaginary sphere that surrounds an object. This allows a map to project onto an image alongside highlights and shadows to create various colours and moods in the scene. This can be altered in the background section seen in Figure 3.
Figure 3.
Not only can this spherical image create an overall projection but can also be split in two sections, upper and lower hemispheres. This method enables a user to have various coloured projections and intensities on a model creating various lighting results depending on the position of the light and distance to the object it is. However the colour of the projected light does influence the coloured surface/texture of a model. In Figure 4 below are two renders placed side by side
Figure 4.
The lower hemisphere has a projection of the map on the lower sections (shaded areas of the model due to the light source being high up) whilst the upper section is unaffected thus leaving the original texture of the model to be seen. The upper hemisphere can be seen clearer and is vast compared to the lower section. Due to the colour of the map being quite green in areas this affects the colour of the model however this can be bypassed by setting the upper and base colours to white (Pure light). However to generating different colours for both lower and upper hemispheres can allow a user to dramatically change the mood or colour of the model. This can be seen below in Figure 5.
Figure 5. Rendering time 226 seconds.
The colour of the hemispheres were set to yellow and orange and the combination of the two then created a skin/clay colour that can be seen. The renders have consistently been around three and a quarter minutes and the overall results have been positive.
Monday, April 21, 2008
Artefact Five - Advanced 3D Mapping & Post Production Composition (Part 4)
The second experiment for post production will be looking at how to create grass using the technique gained earlier by means of opacity mapping and comparing the results with a post production of Photoshop texturing. As the results seen earlier opacity mapping is extremely beneficial to the user for creating complex geometry without having to physically create the objects in 3DS Max. The best way to create grass in an advancing 3DS Max is to buy Plug-ins such as V-ray and Supergrass but the way that it has been created for this experiment is the way that various games use in their industry by using small duplicated planes and in this case the planes will be scattered thoroughly throughout the scene to create a field of grass. Below is the colour map that will give the grass various shades of green and will work well with the lights in the scene that will have shadows turned on. The opacity map that shall be used this will allow
Above is the rendered image is a grassy knoll with a tree on top, it is clear to see the grass has worked and the opacity mapping has done its job. The light in the scene has also created a rounded looking knoll as can be seen with the shaded area to the left and the lit area to the right suggesting the a slope this will be implemented in the post rendered version in the next stage.Again following the structure of the previous water experiment the scene had to be set up ready for a grass texture to be applied in Photoshop to the right is the newly rendered image.
The good thing about this sort of post production is that the grass that will be positioned onto the scene can be easily adapted from any image taken, a user would be able to easily choose what type of grass can be issued from a real world taken image that would in turn give the final image a realistic looks. For this event the image of the grass can be seen below.
When applying the grass texture had to be cloned to the area that needs to be selected before hand, in this case it was all of the green area and then just slightly higher (giving the individual blades space to be seen in front of the background sky). The secondary process was to change the brightness, contrast, hue and saturation to match the rest of the rendered image. Finally the shaded areas were created to give depth and also highlight the areas that were previously seen in the 3DS Max image.
The results of this experiment were quite positive and so too was the feedback given by the peers asked. Although many thought that the 3D rendered image was quite realistic the individual blades of grass could be seen quite well to give an overall depth that they felt worked well many thought that the new post production image worked just as well. Due to the nature of easily being able to adapt a new grass layer a scene can drastically be changed and output can be produced quickly. The way that the 3D render was set using vast amounts of polygons the render took nearly two minutes. The success of this experiment is that both images have a realistic look to them in their own ways and the feedback given was not biased either way.
Conclusion
The two procedures that were covered in the advanced 3D mapping section had positive results, the opacity and displacement mapping allows a user to create realistic and complex geometry with less effort and time but still be able to produce work to a high quality with ease. The advantage of using these type of maps permits a scene to include less polygons which will in turn decrease the rendering time. A benefit if a scene includes a significant amount of objects. The opacity mapping included the best results as the chairs surface had many areas where light passed through and the shadow that cast mimics how the shadow would react if the surface was made purely of geometry. The results given by the post production method have varied in outcome, as the grass experiment had a positive realistic result, it is how the viewer perceives the image in the first place. Even though realism is achievable it is not always necessary to go further and create photo or hyper-realistic imagery. For example even though the resulted feedback given was close, this is a success as people are undecided between the 3D render and the post production method which in turn gives the user the freedom to not only to have an incomplete scene created in Max but the freedom to experiment in Photoshop to create the final output.The way that post production can be used to amend or even enhance a render taken from 3D Studio max can be a benefit to a user in a positive fashion, the two experiments that deal with embracing the concept of altering an image after the render and the techniques used such as displacement mapping can save time and/or produce different results that were not intended in the initial stage of production which in itself can be encouraging.
The results of this experiment were quite positive and so too was the feedback given by the peers asked. Although many thought that the 3D rendered image was quite realistic the individual blades of grass could be seen quite well to give an overall depth that they felt worked well many thought that the new post production image worked just as well. Due to the nature of easily being able to adapt a new grass layer a scene can drastically be changed and output can be produced quickly. The way that the 3D render was set using vast amounts of polygons the render took nearly two minutes. The success of this experiment is that both images have a realistic look to them in their own ways and the feedback given was not biased either way.
Conclusion
The two procedures that were covered in the advanced 3D mapping section had positive results, the opacity and displacement mapping allows a user to create realistic and complex geometry with less effort and time but still be able to produce work to a high quality with ease. The advantage of using these type of maps permits a scene to include less polygons which will in turn decrease the rendering time. A benefit if a scene includes a significant amount of objects. The opacity mapping included the best results as the chairs surface had many areas where light passed through and the shadow that cast mimics how the shadow would react if the surface was made purely of geometry. The results given by the post production method have varied in outcome, as the grass experiment had a positive realistic result, it is how the viewer perceives the image in the first place. Even though realism is achievable it is not always necessary to go further and create photo or hyper-realistic imagery. For example even though the resulted feedback given was close, this is a success as people are undecided between the 3D render and the post production method which in turn gives the user the freedom to not only to have an incomplete scene created in Max but the freedom to experiment in Photoshop to create the final output.The way that post production can be used to amend or even enhance a render taken from 3D Studio max can be a benefit to a user in a positive fashion, the two experiments that deal with embracing the concept of altering an image after the render and the techniques used such as displacement mapping can save time and/or produce different results that were not intended in the initial stage of production which in itself can be encouraging.
Artefact Five - Advanced 3D Mapping & Post Production Composition (Part 3)
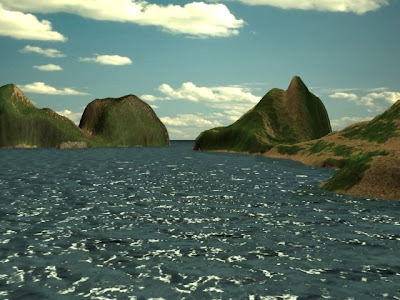
The first part of the post production composition will be looking at adding water to a scene, now 3D Studio Max comes with an in-built water material in its material libraries and this is what was used to create the water on the scene below. A displacement map was used just to lift the surface and create its uneven pattern. An opacity map has also been used but has been kept to a minimum, this can be seen to the right of the image where the water meets the land and a small darkened tint in the water can be seen which gives the water a shallow look here.
To allow a fair experiment to be issued the image had to be re rendered to not show the displaced water surface, instead the objects properties were stripped back to its original plane showing its original colour. This method will allow the post rendering Photoshop water to have the same colour properties and the only alteration will be the final output of the displaced water. Below is the render that is ready for use.
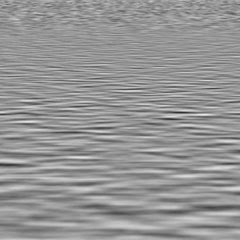
To create the distortions and reflection of the surrounding that will make the water look like liquid a displacement map must be created and this will coincide with the distortion setting on Photoshop. To the right is the displacement map created for this purpose.This map will ‘shift pixels’ in an image according to the brightness values of the map. For example the lighter areas will shift these pixels more than the darker areas causing a depth effect in the image.However in Photoshop the channels area is very important as the first two channels are used to calculate the horizontal and vertical shifts of displacement. This advantage can be had by stretching one of the channels and leaving the other as the normal to create a random uneven look to the water.
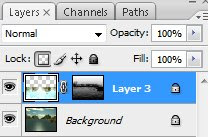
To create the water effect and the reflection of the islands the area above the blue plane that was not the water section was copied and then inverted vertically and a quick mask was issued on the same layer, this would allow the displacement map to filter through the layer and use the colour of the planethat was created in 3DS Max which in turn will have the same colour properties to allow for proper assessment.
The key factors when using displacement in Photoshop is that it the amount that is produced depends on the initial map – both the amount of brightness issued and also the amount of distance between the first and second channels. Another factor is that there is an addition height and width instruction that enables a user to force the displacement map to stretch the layer that it has been placed on.
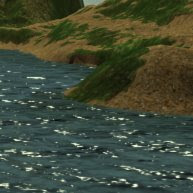
The amount of displacement was double from the previous image and had an undesirable effect, the white parts of the displacement have been overwhelmed and the water now appears to have distinct areas that do not look effective or realistic. However the white areas does give the water area more depth much like how the water looks in the rendered image from 3DS Max.
Changing the amount of white light to filter through to the water was amended in the levels area of Photoshop, by selecting the white input levels and slowly moving them down the scale to the black levels the water can then be issued with the amount of light that falls onto the displacement map thus allowing the waves to have a various range and finally giving the water more depth.
After showing the images to a section of the population around twenty subjects, just over half of the votes leaned towards the initial rendered from Max and likewise I feel the same way, the waves look more realistic such as the waves you would see on the ocean or at a beach. The conclusion for this experiment is that the 3DS Max water material has the benefit of looking more realistic and the control of the amount of displacement is more beneficial and far quicker to a user than creating on Photoshop. The time taken to generate and render the water was far quicker than the post production method.
The first part of the post production composition will be looking at adding water to a scene, now 3D Studio Max comes with an in-built water material in its material libraries and this is what was used to create the water on the scene below. A displacement map was used just to lift the surface and create its uneven pattern. An opacity map has also been used but has been kept to a minimum, this can be seen to the right of the image where the water meets the land and a small darkened tint in the water can be seen which gives the water a shallow look here.
To allow a fair experiment to be issued the image had to be re rendered to not show the displaced water surface, instead the objects properties were stripped back to its original plane showing its original colour. This method will allow the post rendering Photoshop water to have the same colour properties and the only alteration will be the final output of the displaced water. Below is the render that is ready for use.
To create the distortions and reflection of the surrounding that will make the water look like liquid a displacement map must be created and this will coincide with the distortion setting on Photoshop. To the right is the displacement map created for this purpose.This map will ‘shift pixels’ in an image according to the brightness values of the map. For example the lighter areas will shift these pixels more than the darker areas causing a depth effect in the image.However in Photoshop the channels area is very important as the first two channels are used to calculate the horizontal and vertical shifts of displacement. This advantage can be had by stretching one of the channels and leaving the other as the normal to create a random uneven look to the water.
To create the water effect and the reflection of the islands the area above the blue plane that was not the water section was copied and then inverted vertically and a quick mask was issued on the same layer, this would allow the displacement map to filter through the layer and use the colour of the planethat was created in 3DS Max which in turn will have the same colour properties to allow for proper assessment.
The key factors when using displacement in Photoshop is that it the amount that is produced depends on the initial map – both the amount of brightness issued and also the amount of distance between the first and second channels. Another factor is that there is an addition height and width instruction that enables a user to force the displacement map to stretch the layer that it has been placed on.
The amount of displacement was double from the previous image and had an undesirable effect, the white parts of the displacement have been overwhelmed and the water now appears to have distinct areas that do not look effective or realistic. However the white areas does give the water area more depth much like how the water looks in the rendered image from 3DS Max.
Changing the amount of white light to filter through to the water was amended in the levels area of Photoshop, by selecting the white input levels and slowly moving them down the scale to the black levels the water can then be issued with the amount of light that falls onto the displacement map thus allowing the waves to have a various range and finally giving the water more depth.
After showing the images to a section of the population around twenty subjects, just over half of the votes leaned towards the initial rendered from Max and likewise I feel the same way, the waves look more realistic such as the waves you would see on the ocean or at a beach. The conclusion for this experiment is that the 3DS Max water material has the benefit of looking more realistic and the control of the amount of displacement is more beneficial and far quicker to a user than creating on Photoshop. The time taken to generate and render the water was far quicker than the post production method.
Artefact Five - Advanced 3D Mapping & Post Production Composition (Part 2)
The second area covered in the advanced mapping section will be looking at displacement mapping. This sort of mapping works similar to bump mapping which was covered in the first artefact, in the way it works of making a flat surface made to look like it has a uneven one. However displacement maps physically makes a flat surface indeed look irregular. The example below shows the initial plane with a metal like texture and also a black and white peace sign which will be the displacement map.
The black and white displacement map works in the same way as a bump map where the colour decides what section of a map will be displaced on an object. In this case the black area shall be unaffected whilst the white section will be altered. First of to see how the displacement alters an objects geometry a bump map will be placed onto the surface first and a comparison can be made.
The bump map effects are very subtle, the objects surface looks like it has been embossed with peace sign and the black outline that has been created shows the difference in height. Now comparing this to the displacement map (note both the bump and displacement map are both the same to remain consistent) the embossed area looks far definitive and the height of the object can be seen more clearly than previously with the bump map. A fine quality that displacement mapping possesses is that when the object has been embossed the polygon count will be unaffected. This can be highly beneficial in a complex scene where there are many objects.
At this point peers were asked if the displacement map looks more definitive than the previous bump map and all of them agreed, however a handful suggested if the scene had both displacement and bump maps present and this was done in the next step and the resulted render can be seen below.
The same peers were asked if the new image gives the impression of being more realistic than the previous displacement map rendered image. As the bump map gives a definitive shaded area around the peace sign the geometry looks uplifted and embossed with more quality. The peers gave a similar contribution to my thoughts and are much more positive with the final result. From this procedure the results have been constructive the use of displacement mapping can significantly alter the geometry of an object without using more polygons which is a benefit as it allows a user to create complex scene with less effort for the renderer.
The second area covered in the advanced mapping section will be looking at displacement mapping. This sort of mapping works similar to bump mapping which was covered in the first artefact, in the way it works of making a flat surface made to look like it has a uneven one. However displacement maps physically makes a flat surface indeed look irregular. The example below shows the initial plane with a metal like texture and also a black and white peace sign which will be the displacement map.
The black and white displacement map works in the same way as a bump map where the colour decides what section of a map will be displaced on an object. In this case the black area shall be unaffected whilst the white section will be altered. First of to see how the displacement alters an objects geometry a bump map will be placed onto the surface first and a comparison can be made.
The bump map effects are very subtle, the objects surface looks like it has been embossed with peace sign and the black outline that has been created shows the difference in height. Now comparing this to the displacement map (note both the bump and displacement map are both the same to remain consistent) the embossed area looks far definitive and the height of the object can be seen more clearly than previously with the bump map. A fine quality that displacement mapping possesses is that when the object has been embossed the polygon count will be unaffected. This can be highly beneficial in a complex scene where there are many objects.
At this point peers were asked if the displacement map looks more definitive than the previous bump map and all of them agreed, however a handful suggested if the scene had both displacement and bump maps present and this was done in the next step and the resulted render can be seen below.
The same peers were asked if the new image gives the impression of being more realistic than the previous displacement map rendered image. As the bump map gives a definitive shaded area around the peace sign the geometry looks uplifted and embossed with more quality. The peers gave a similar contribution to my thoughts and are much more positive with the final result. From this procedure the results have been constructive the use of displacement mapping can significantly alter the geometry of an object without using more polygons which is a benefit as it allows a user to create complex scene with less effort for the renderer.
Artefact Five - Advanced 3D Mapping & Post Production Composition (Part 1)
The fifth artefact will be dealing with the second part of the compositions research and also advanced mapping in 3D studio Max. The composition this time will be focusing on altering or adding to a render created in 3D Studio Max, unlike last time where the focus was on amending the lighting and shading to create a clearer more dominant outcome the scenes created in this artefact will focus on actual objects in the scene. An example would be to add grass to a rendered scene in Photoshop instead of creating and rendering it in 3D Studio Max. The first of the artefact will look at advanced mapping, mainly concentrating on displacement and opacity maps. These will be used to alter an object(s) that has been created in 3DS Max to make them look that they have been modelled thoroughly. In a sense the artefact will be experimenting how to ‘cheat’ an object into looking that more work has been put into it than it really has whilst still giving good results.The point of the artefact as a whole is to distinguish a method that can fasten together two different applications and reduce the amount of time to create the overall output (rendered images) but still enable the quality that is desired.
Advanced 3D Mapping
The first area covered of the advanced mapping section will be looking at opacity mapping. Opacity maps in 3D Studio max are used to create an illusion of geometry that isn’t there in the first place. A user can then create unusual or even fairly complex objects that can be visualised and made to look like the whole object has been painstakingly modelled. The scene that will be looked at for this procedure will be a simple chair. Below is the rendered chair in its original state and everything has been modelled and textured, the main problem with the chair is that the shadow underneath is blocky. As the chair itself will have holes that can be viewed, the light cast on the object must be able to pass through and create the new shaded areas.
Original chair with blocky shadow. Rendering time 2 seconds
The next item to change in the scene is to apply the opacity map that will allow the light to pass through the chair holes and also create the geometry to look like the model has been done with some time taken. How the opacity map works in 3d Studio max is that when it is placed onto an object it creates a transparent effect that follows the colour of the map, the example below shows an opacity map of black circles on a white background. Here these black circles will be 100% transparent and the white 0%.
Below is of the image with the effects taken into account and the transparency has been set to 100%. Setting it to the upper limit will totally craft the black areas into full transparency whilst anything less will show a slight greyish tint where the black is and create a glass look which is not wanted here.
Chair with Opacity Map and shadow. Rendering time 2 seconds. Polygon count 9,174.
Notice that the black areas can now not be seen at all on the chair seat and rest and also the bonus of opacity mapping is that it allows the light in the scene to pass through and create the shadow that can be seen on the floor below.The final stage of this experiment is to create a chair that is fully modelled with the detail in the previous render, however each hole will be physically modelled to create the geometry of the final chair. From here, an analysis can be made to distinguish if viewers will find the effect of the opacity map will give similar results or indeed better results than the fully modelled chair. Below is the image of the final rendered modelled subject.Chair with no opacity map and shadow. Rendering time 3 seconds. Polygon count 37,358.
There is not much difference in rendering time between the renders, however it is clear to see the difference in polygon count. Granted that the second subject has a few more holes than the previous, the concept that the modelling of each hole will create more polygons which will take longer to render.The feedbacks in results given by peers were quite positive the all of them reported back that they could see no difference between the two renders (besides the amount of holes). This in turn has made this experiment a success showing that opacity mapping can be as good as modelling geometry for a subject.The conclusion from this procedure has been a positive one, using opacity mapping can be used to reduce the amount of time taken to create objects and the secondary benefit is that light can pass through to create shadows as well as a model that was created with pure geometry. Rendering times are cut via the amount of polygons that are not there which in turn is excellent for larger more complex scenes.
The next item to change in the scene is to apply the opacity map that will allow the light to pass through the chair holes and also create the geometry to look like the model has been done with some time taken. How the opacity map works in 3d Studio max is that when it is placed onto an object it creates a transparent effect that follows the colour of the map, the example below shows an opacity map of black circles on a white background. Here these black circles will be 100% transparent and the white 0%.
Below is of the image with the effects taken into account and the transparency has been set to 100%. Setting it to the upper limit will totally craft the black areas into full transparency whilst anything less will show a slight greyish tint where the black is and create a glass look which is not wanted here.
Chair with Opacity Map and shadow. Rendering time 2 seconds. Polygon count 9,174.
Notice that the black areas can now not be seen at all on the chair seat and rest and also the bonus of opacity mapping is that it allows the light in the scene to pass through and create the shadow that can be seen on the floor below.The final stage of this experiment is to create a chair that is fully modelled with the detail in the previous render, however each hole will be physically modelled to create the geometry of the final chair. From here, an analysis can be made to distinguish if viewers will find the effect of the opacity map will give similar results or indeed better results than the fully modelled chair. Below is the image of the final rendered modelled subject.Chair with no opacity map and shadow. Rendering time 3 seconds. Polygon count 37,358.
There is not much difference in rendering time between the renders, however it is clear to see the difference in polygon count. Granted that the second subject has a few more holes than the previous, the concept that the modelling of each hole will create more polygons which will take longer to render.The feedbacks in results given by peers were quite positive the all of them reported back that they could see no difference between the two renders (besides the amount of holes). This in turn has made this experiment a success showing that opacity mapping can be as good as modelling geometry for a subject.The conclusion from this procedure has been a positive one, using opacity mapping can be used to reduce the amount of time taken to create objects and the secondary benefit is that light can pass through to create shadows as well as a model that was created with pure geometry. Rendering times are cut via the amount of polygons that are not there which in turn is excellent for larger more complex scenes.
Subscribe to:
Posts (Atom)