


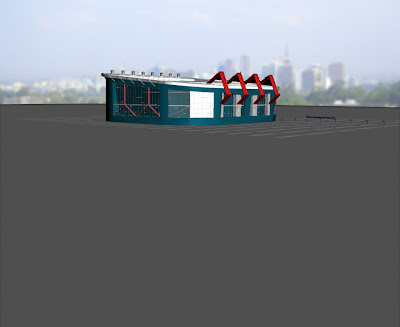
 A distant shot of the stadium, as you can i have made the roof slant (not just for the cool look but for rain purposes too!) I also kept the red metal bars outside the stadium much the the City Ground but raised them higher.
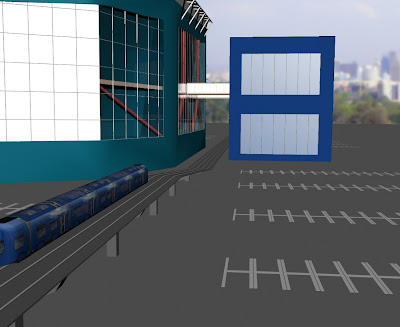 The tram line. As a fair amount of cars cause traffic and pollution i created a tram that goes straight to the stadium.
 The inside of the stadium (before the seats are in place). You can see the size of the arena, below the pitch with the billboards around and the goal on the far end. Above is a glass roof to keep out poor weather which we tend to get here in Nottingham!
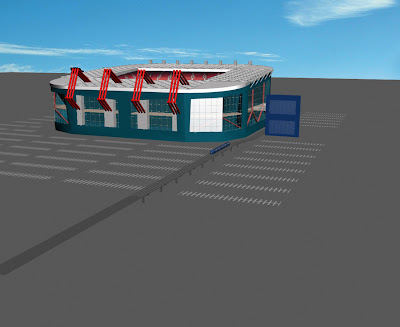 Another distant shot of the stadium viewing the tram line car park and both buildings. You can see that the stadium is separated into two levels access to the seated tiers can be via stairs, elevators, escalators.
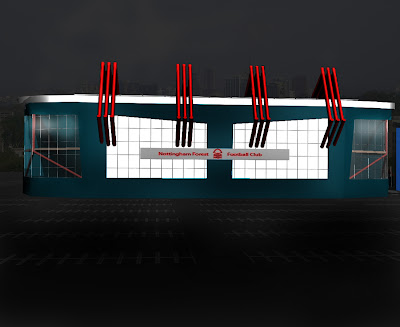 Outside again at night. One of my favorite features of the stadium is the windows (looking at Asian stadiums - particularly Chinese) they cover their arenas with glass. I decided to not use pure glass and leave some of the main structure showing.
 The top of the stadium, i added the seats in to show what the new venue may look like, and hopefully in a few years time we ccn be back in the Premiership and replace Derby.
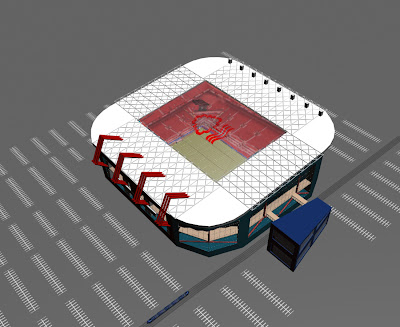 Another feature of the stadium that i wanted is a moving roof, in case of rain the two sides of the glass roof would come together and join in the middle. When closed, the Forest emblem can be seen from inside the stadium and also from above.
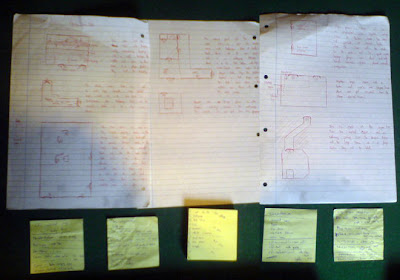
Vocal noise reduction - The Chris Bilewicz Way
A quick experiment I did was to reduce the background noise in a vocal track, I had some spill from drum in the recording process and I got rid of a lot of it by doing these steps…

All of my mastering was done in adobe audition, I bounced the tracks from Pro Tools and imported them in. The first thing that was done to the tracks once mixed was to clean up the beginning and the ends, some cases there were large amounts of banter and silence, I deleted time that was not needed and faded in/ out on some of the tracks this can be heard the best on Take Your Time.
To get the songs to CD volume I took two steps - the first was using a MultiBand Compressor which allowed me to define the crossover frequencies and compress them which will give me the option to raise the volume up slightly.
With that little bit more space to work with the second step was to fill it. I then used a hard limiter and depending on the track raise the volume of the track above a defined threshold but also taking care of any clipping that may occur.
Surround Sound
The surround sound mix for Glad You Could Make It was also done using Adobe Audition. I bounced a few tracks from the session from pro tools these were;
These were then all sent in various directions with automated movement as the song went on. The lead guitars were split left and right forward whilst the violins were sent to the back and brought centre left and right.
The Songs
O.V.E.R
For this song I wanted it to be quite guitar driven so I put them straight to the front, using a high end equalizer on the amplifier the guitar cuts through the other instruments in the song. As this was quite harsh in the beginning I added a bit of reverb and also a delay to carry on the sound each time the strumming finishes. Following the pattern of the high-end guitars I also wanted the high hats and the snare to cut through - kind of like a punk song, the sex pistols collection cd's gave me this influence. So everything so far is in the top end of the audio spectrum, which didn’t leave too much space for the vocals. Luckily the vocalist had quite a deep voice so I could play about in the middle of the EQ range (around 2k) and then for that little bit of emphasis I gave a little high end around 16k for that definition I wanted.
For the low ends of the songs are as normal, the bass guitar and the kick drum. As the guitars are all mainly in the top end of the spectrum I decided to put a little room reverb at around 25% to swamp the sound to say. The kick drum took the 40-110 and a little bit on the 3k range on the EQ at +6 to give it that driving sound that I want - but not too much as the bass guitar will get crowded out.
Along side with the guitars, the snare is a driving part to this song. With it being miked from below and from the top gave me easy access to a tinny sound (increasing the top snare output) or a deeper thuddier sound (increasing the bottom snare output). Firstly I gated off the low-end frequencies such as the bass or tom drums that leaked in the recording process. The high hats were still visible but didn’t worry me too greatly. Once the gating was complete I compressed the snare, which then allowed me the comfort of increasing the volume without any clipping.
Let Me Hear You Say
This track slightly follows the way that the previous track O.V.E.R. does as they are quite similar in style. So remembering what I did in that session I used in this one thereabouts. RTAS plug-ins such as compression for the vocals & high hats to lift them up in volume and punch through the mix, light reverb for vocals and anything else that needed toning down that little bit as they were too bright for my liking.
In the recording stage (in the studio and at home) DI boxes were used alongside the microphones to pick up the guitar and bass twice. The DI was tapped off before the signal reaches the amp so that only the natural strumming can be heard (e.g. no gain or tone controls from the amp are in this individual audio track). With this track I used an RTAS plug-in called amplitube. Amplitube has varied amount of guitar sounds such as wah-wah and distortion with various amp models and cabinets. I chose a sound that was quite grungy but still tolerable with the actual guitar sound from the recorded amplifier in the live room. The band The Vines were an influence for me at the stage of mixing the song.
This track is my experimental one for various amounts of reasons. When I was taught about Foley where everyday sounds can be recorded and placed with video I decided to record a few of my own sounds and place them within the track near the beginning. I recorded a jet engine and then edited it within Cool Edit Pro using effects such as phase sweeping and a hint of delay to create a completely different sound. I cheated by using a midi keyboard to create a Morse code sound, all of this was to see if I could try and entwine them into the song. Another experiment was grouping and bussing various instruments so that I can have more layers and also making volume adjusting a bit faster. My favorite experiment was the over compressed drums during the second half of the verses and the interlude of the song mid way, the drums were so far compressed that the hits of the kit started to slightly phase out, not only this but the attack and release times were groggy. I compensated for this with bussing of the overheads, high hats and snare drum. Overall I love the drum sound when all the instruments have kicked in and the song is in full flow. The final part of the song has reversed lead guitar that was processed with Adobe Audition.
Glad You Could Make It
I used a midi keyboard in this track alongside with Sample Tank. Using pop violins they were equalized to mainly the mids and highs, thus bringing them out that little bit more. The guitar then used the space on the audio spectrum where the violins were not so they wouldn’t get muddled together, placing +12 dB at 20k, a low lying mid range and then a slight boost in the bass at around 40-80. The bass then sits on top of the guitars low end and carries through into the mid range allowing the freedom of carrying the song through as the violins take control in the choruses. The drum kit for this track is pretty much none existent as it is quite a slow song (oasis-ish) the bass drum was dynamically compressed using the bass guitar default in pro tools and then I used a plate reverb at 15 percent to make the kick echo slightly. For the previous tracks I setup the snare to have a quick attack time and really punch through in the mix. However, in this track I wet the sound with 1/3 of hall reverb and also gave a 300ms pre-delay and a 4.5 second decay to smooth out the hits and also give the snare the feel of being in the background.
The vocals sound was quite good for the initial recording so not much had to be done, slight compression with a soft knee, a little bit of reverb( but not too much) and finally bringing out the high end and dropping the low end all together whilst equalizing. As the singer had quite a deep voice.
There was some automation in the other songs e.g. fade out of jet sound at the start of Take Your Time. In Glad You Could Make It I automated the violins to be more prominent in the choruses and the outro and then be quieter in the verses. Also automating the guitars on all of the tracks (mainly the choruses) and allowing them to roam free in the breaks as any other instrument is turned down slightly to make way.
Overheads
Probably the most natural sound that can be obtained is with a high-quality condenser mic positioned overhead and either in front of or behind the kit. As symbols radiate sound in a sort of figure of eight above and below the symbol plane whilst the hi hats radiate horizontally, so positing a microphone closer to this plane will reduce noise level. I chose to get a fair amount of symbol noise – as I can alter the sound if needed within Pro Tools. For the purpose of recording the band I used two Neumann U87(s) over head the drums and slightly in from of the kit – these were around 2 meters in the air.
Kick Drum
Due to the demanding pressure that the kick drum creates when in action only a few mics can actually work in this atmosphere. A moving coil microphone is preferred in this position, so I hooked up the kick drum with an AKG D112. This microphone is good for consistently picking up a low frequency response. For positioning purposes the front drum skin was taken off and the microphone positioned slightly off centre and closer to the bottom of the drum (just above the light padding). The padding is used to dampen any ringing within the drum and provide a more rock drive sound.
Snare Drum & Hi-hats
My favourite microphone that I have used so far for the hi-hats is the trusty pencil like condenser microphone AKG C451. Previously I used to use a Shure SM57 but know tend to use them hand-in-hand with the 58’s on the toms. I have found that the C451 microphone gives the snare sound a little bit more top end, I do like a tinny snare! The mic was positioned at around a 45 degree angle above the head and quite close to the edge – two reasons for this, one hopefully the drummer will not hit it! The second is to give maximum attack as the drumsticks hit fairly close to the mic. I tend to also use a C451 or SM57 at the bottom of the snare drum, this to give me more of my tiny sound that I admire so much.
Again the use of a C451 (I feel like I am marketing this microphone a lot) and an acute angle is used for the hi hats - as talked about before the sound of the sound comes at a horizontal plane unlike the symbols. The main thing here is not to place the mic too close as it can pick up chuff of air each time the hats open and close. The mic is around 10 centimetres on the far side of the drums so the amount of spillage from the kit is at a minimal.
Toms
In a rock oriented drum sound (which is what I am after) all the toms will be miked up. As the kit has a fair few mics recording it the use of a gate will reinstate some sort of separation between each drum. For the recording session I used Shure 58’s for all the toms, trying to keep them around an inch away from the top head and very near to the side. Again for the drummer not to hit them but also toms give a few more harmonics at the rim which will give the toms an overall warmer sound when playing back. I try and position them facing away from the symbols if possible again for spillage reasons.
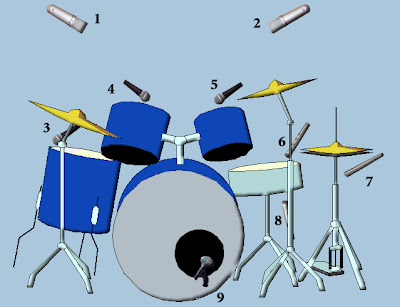
Just a quick summary of my mic positions…
1 & 2) NEUMANN U87 to record overheads and will be panned slightly left and right during mixing for a stereo drum mix.
3,4 & 5) SHURE 58 to record toms closely, facing them away to avoid a little bit of spillage.
6) AKG C451 or SHURE 57 to record the top of snare, the closer the better for a quick attack time.
7 & 8) AKG C451 to record the bottom snare (the thick sound) also the hi hats – making sure to face slightly away from kit and not completely horizontal to the plane of air coming from the close.
9) AKG D112 with or without the kick drum skin placed off centre where the pressure is the most and above any padding. This mic picks up low frequencies like a charm.
Setting up
The songs that I am recording/mixing this year are from the band that I am in called ‘The Giveaways’. As I could not get any time in the University sound studio in the Bonnington building we went to Confetti Studios that are located in Nottingham City Centre. So for the recording…
As the drum kit was used in the same room as the rest of the band (in a couple of songs) some acoustic screens were used to try and reduce the leakage from the kit going into the other instrument and vocal mics. We all set up everything ourselves and I even learned how a drum kit goes together! We put the kit into the mixing desk tracks as follows….
| Kick Drum | 1 |
| Overhead left | 2 |
| Overhead left | 3 |
| High Hat | 4 |
| Snare Top | 5 |
| Snare Bottom | 6 |
| High Tom | 7 |
| Low Tom | 8 |
| Floor Tom | 9 |
The Guitar amps used were Marshall MG 200&250 series and a Peavey TKO 115. For the guitars a Shure 58 was placed around two inches away and facing the bottom edge of the cone this is so that the mic does not pick up every single low end possible otherwise the guitars will sound pants. The bass amp was miked in the same manner but using AKG D112. All the guitars were also hooked up with a DI box to patch into the guitars sound before it gets to the amp. This is quite useful as later in the mixing process I can use amplitube process in Pro Tools to give a different sound. The further tracks to the mixer..
| Tom Guitar | 10 |
| Tom DI | 11 |
| Chris Guitar | 12 |
| Chris DI | 13 |
| Alex Bass | 14 |
| Alex DI | 15 |
The vocals also used a Shure 58 to record them so this was track 16 on the mixer. Whilst we were playing our songs we asked (stole) a friend Chris Baines to watch the levels – this was good practice for him as this is his first year at Confetti. Anyway all the tracks were recorded into one session and then saved onto an external hard drive for me to mix/master at home. This was a lot easier than doing multiple sessions as it saved time and hassle on the day. The tracks obviously were split down later and saved accordingly. A few things needed to be re recorded such as vocals & backing and also little lead guitar bits and eventually some midi. These were done in our mini studio in my shed, using the same mics as we did on the day to keep some sort of consistency even if the natural rooms reverb was slightly different.
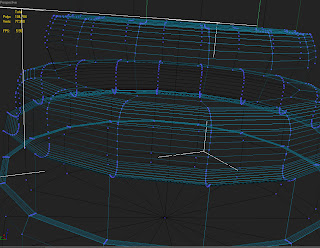
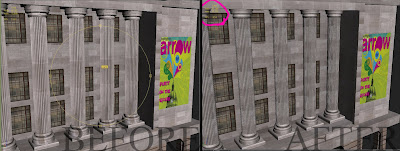
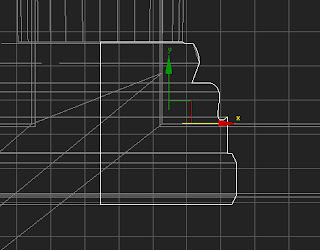 Due to the overwhelming amount of ploys that are really not needed for a scene like this, i cleaned it up by collapsing multiple vertex points but still trying to keep the shape as i originally planned.
Recording a band
Setting up the Drums
The songs that I am recording/mixing this year are from the band that I am in called ‘The Giveaways’. As I could not get any time in the University sound studio in the Bonnington building we went to Confetti Studios that are located in Nottingham City Centre. So for the recording…
This blog post will be all about recording drums, the kit that we used consists of kick drum, snare, a couple of tom-toms mounted on stalks from the kick drum, a floor tom, a hi-hat, and a couple of cymbals (crash and ride) .
As the drum kit was used in the same room as the rest of the band (in a couple of songs) some acoustic screens were used to try and reduce the leakage from the kit going into the other instrument and vocal mics.
Overheads
Probably the most natural sound that can be obtained is with a high-quality condenser mic positioned overhead and either in front of or behind the kit.
As symbols radiate sound in a sort of figure of eight above and below the symbol plane whilst the hi hats radiate horizontally, so positing a microphone closer to this plane will reduce noise level. I chose to get a fair amount of symbol noise – as I can alter the sound if needed within Pro Tools. For the purpose of recording the band I used two Neumann U87(s) over head the drums and slightly in from of the kit – these were around 2 meters in the air.
Kick Drum
Due to the demanding pressure that the kick drum creates when in action only a few mics can actually work in this atmosphere. A moving coil microphone is preferred in this position, so I hooked up the kick drum with an AKG D112. This microphone is good for consistently picking up a low frequency response. For positioning purposes the front drum skin was taken off and the microphone positioned slightly off centre and closer to the bottom of the drum (just above the light padding). The padding is used to dampen any ringing within the drum and provide a more rock drive sound.
Snare Drum & Hi-hats
My favourite microphone that I have used so far for the hi-hats is the trusty pencil like condenser microphone AKG C451. Previously I used to use a Shure SM57 but know tend to use them hand-in-hand with the 58’s on the toms. I have found that the C451 microphone gives the snare sound a little bit more top end; I do like a tinny snare! The mic was positioned at around a 45 degree angle above the head and quite close to the edge – two reasons for this, one hopefully the drummer will not hit it! The second is to give maximum attack as the drumsticks hit fairly close to the mic. I tend to also use a C451 or SM57 at the bottom of the snare drum, this to give me more of my tiny sound that I admire so much.
 Again the use of a C451 (I feel like I am marketing this microphone a lot) and an acute angle is used for the hi hats - as talked about before the sound of the sound comes at a horizontal plane unlike the symbols. The main thing here is not to place the mic too close as it can pick up chuff of air each time the hats open and close. The mic is around 10 centimetres on the far side of the drums so the amount of spillage from the kit is at a minimal.
Toms
In a rock oriented drum sound (which is what I am after) all the toms will be miked up. As the kit has a fair few mics recording it the use of a gate will reinstate some sort of separation between each drum. For the recording session I used Shure 58’s for all the toms, trying to keep them around an inch away from the top head and very near to the side. Again for the drummer not to hit them but also toms give a few more harmonics at the rim which will give the toms an overall warmer sound when playing back. I try and position them facing away from the symbols if possible again for spillage reasons.

